

Table of Contents
- What Determines HD Quality in a Live Stream
- Internet Speed for Live Streaming: Bandwidth Essentials
- Choosing Resolution: 720p vs 1080p for Your Audience
- Best Bitrate for 1080p Live Streaming and Frame Rates
- Live Streaming Encoder Settings: Configuration for Quality
- How to Test a Live Stream Before Your Event
- Troubleshooting Dropped Frames, Buffering, and Pixelation
- Frequently Asked Questions
Last Updated: October 16, 2026
What Determines HD Quality in a Live Stream
HD quality live stream performance depends on four core factors: resolution, frame rate, bitrate, and your internet connection. These elements work together. Miss one, and viewers see pixelation, stuttering, or buffering.
Resolution sets the pixel count, frame rate controls smoothness, bitrate determines data sent per second, and internet speed is the foundation.
You don’t need expensive equipment, just the right settings matched to your actual bandwidth and platform.
Internet Speed for Live Streaming: Bandwidth Essentials
Your upload speed is the bottleneck. Download speed doesn’t matter for streaming, only upload does.
Here’s what you need to know:
- 720p at 30 FPS: Minimum 2.5 Mbps upload speed
- 720p at 60 FPS: Minimum 4.5 Mbps upload speed
- 1080p at 30 FPS: Minimum 4.5 Mbps upload speed
These are baseline figures. Add 50% buffer for network instability. If your test shows 5 Mbps, don’t stream 1080p at 60 FPS, you’ll drop frames.
Many teams skip this step and regret it during their live event. Test now. Adjust your settings based on what you find.
Choosing Resolution: 720p vs 1080p for Your Audience
720p delivers clear video for most viewers. 1080p looks sharper but requires more bandwidth. The right choice comes from a measured upload speed and a deliberate headroom margin, not from picking the biggest number.
Most guides stop at “use 1080p if you can,” ignoring the sustained upload speed you actually have on event day, and the fact that the platform and viewer’s device decide what gets played back.
Start with a measured upload speed, not a guess
Run a speed test from the exact location and network you will stream from, at the same time of day as your event, at least three times.
Then apply a headroom rule: use no more than about 70% of your lowest measured upload speed for total bitrate (video plus audio).
That gives you a simple decision table:
- Lowest measured upload under 4 Mbps: stream 720p at 30 FPS. Do not attempt 1080p.
- Lowest measured upload 4-6 Mbps: 720p at 30 or 60 FPS, or 1080p at 30 FPS if the content is mostly static.
- Lowest measured upload 6-10 Mbps: 1080p at 30 FPS comfortably; 1080p at 60 FPS only if the low end of your tests stays above about 9 Mbps.
Worked example: three tests return 9.2, 7.8 and 6.4 Mbps.
Your output resolution does not guarantee HD playback
What you send is not always what the viewer receives.
- Platform transcoding. Most major platforms re-encode your stream into multiple renditions (an adaptive bitrate ladder). If you send 1080p, the platform may still serve a viewer 720p or lower depending on their connection, device, and platform load. Sending more resolution than the platform reliably transcodes wastes upload without improving playback.
- Viewer device and settings. A phone viewer may be capped by data-saving settings or mobile network conditions; a large desktop monitor may see the full 1080p.
- Viewer connection quality. Adaptive playback steps down when the viewer’s download speed or Wi-Fi stability drops. You can’t control this from the encoder; just make sure the top rendition you send is clean enough that step-downs look good.
If your platform lets you choose which renditions to enable, send the highest resolution you can sustain and let the platform’s ladder handle the rest.
Match resolution to content and audience, not to pride
- Talking-head presentations, webinars and training: 720p at 30 FPS is usually indistinguishable from 1080p after transcoding, and leaves more headroom for a stable stream.
- Product demos, text-heavy slides, detailed visuals: 1080p at 30 FPS earns its bandwidth because fine detail survives compression better at higher resolution.
- Sport, gaming, movement-heavy content: prioritise frame rate over resolution. 720p at 60 FPS often reads as smoother and more ‘HD’ to viewers than 1080p at 30 FPS with motion blur.
Don’t chase 4K
4K needs roughly 15 Mbps or more of sustained upload, a platform that ingests and transcodes it, and viewers on large screens with fast connections. For most events, a stable 1080p stream at a bitrate your connection can hold looks better to more people than a stuttering 4K stream. Stability is the quality signal viewers notice; resolution is the one they rarely check.
Best Bitrate for 1080p Live Streaming and Frame Rates
For 1080p, use a bitrate between 4,500 and 8,000 kbps depending on your frame rate and content type.
Frame rate controls smoothness. Higher frame rates look smoother but use more bitrate.
Here’s the breakdown:
- 1080p at 30 FPS: 4,500-6,000 kbps (good for static content like presentations)
- 1080p at 60 FPS: 6,000-8,000 kbps (better for fast movement like sports or gaming)
- 720p at 30 FPS: 2,500-4,000 kbps
Use constant bitrate (CBR) for live streaming; CBR keeps quality consistent.
If your upload speed is unstable, lower your bitrate by 10-15%. A stable lower bitrate beats a high bitrate with dropped frames, viewers notice buffering and pixelation instantly, but won’t notice 5,500 kbps instead of 6,500 kbps.
Live Streaming Encoder Settings: Configuration for Quality
Your encoder converts your camera feed into a format viewers can watch. Getting encoder settings right prevents most quality problems.
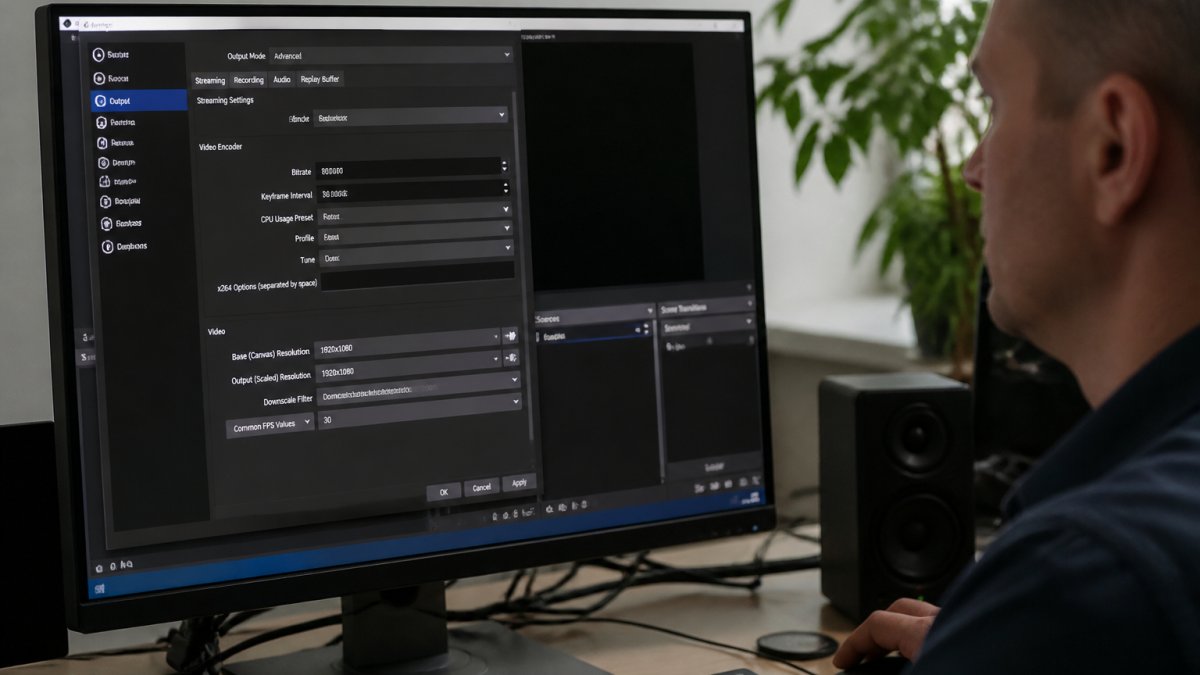
Start with these core settings:
- Video codec: H.264 (works on all devices and platforms)
- Audio codec: AAC (standard for live streams)
- Audio sample rate: 48 kHz (broadcast standard)
Match your encoder bitrate to your actual upload speed.
Use adaptive bitrate streaming if your platform supports it. It adjusts video quality to viewer bandwidth: fast connections see 1080p, slower ones see 720p or 480p.
Many platforms offer this automatically. Check your platform’s documentation and enable it if available.
How to Test a Live Stream Before Your Event
Test your HD quality live stream 24 hours before your event. Not 10 minutes before. A full test catches problems when you can still fix them.
Follow this process:
- Set up your equipment exactly as you’ll use it during the event. Same camera, same location, same internet connection.
- Run a speed test. Document your upload speed.
- Start a test stream to your platform. Stream for at least 5 minutes.
- Watch on multiple devices. Check desktop, phone, and tablet.
- Look for pixelation, buffering, or audio sync issues. Note any problems.
- Check your encoder’s stats. Look for dropped frames or network warnings.
- Adjust settings if needed. Lower bitrate, reduce resolution, or change frame rate based on what you see.
- Run a second test. Verify your fixes worked.
Document your final settings and use the exact same ones for your actual event.
Common issues during testing:
- Dropped frames: Lower your bitrate by 500 kbps
- Pixelation: Lower your bitrate or reduce resolution
- Audio out of sync: Check your audio delay settings (usually adjustable in your encoder)
Testing takes 30 minutes. It prevents disasters during your live event.
Troubleshooting Dropped Frames, Buffering, and Pixelation
Most stream quality problems fall into two buckets: your side (encoder, upload, source) and the viewer’s side (their download, device, platform playback). Diagnose which bucket you are in before changing settings, or you will fix the wrong thing.
Use this symptom-based workflow. For each symptom, check the likely cause in order, from cheapest to most disruptive to fix.
First, establish where the problem is
Before touching settings, answer three questions:
- Does the problem appear in your encoder’s own preview and stats? If yes, it is on your side.
- Does it appear on every viewer’s device, or only some? If only some, it is likely viewer-side or platform-side.
- Does it appear in the platform’s recording or VOD after the event? If the recording is clean but live playback was not, the issue is in delivery, not capture.
A clean recording plus a bad live experience points to delivery and viewer conditions. A bad recording points to your encoder, source, or upload. This single check saves hours of misdirected fixing.
Dropped frames (stuttering, judder)
Dropped frames mean your encoder could not keep up, either the CPU/GPU is overloaded or the upload link cannot carry the bitrate you set.
Check in this order:
- Encoder load. Look at your encoder’s CPU or GPU usage. Sustained high usage with dropped frames means the machine, not the network, is the limit. Close other applications, lower your encoding preset (faster preset, slightly lower quality per bit), or reduce resolution or frame rate.
- Upload saturation. If encoder load is fine but frames still drop, your bitrate is too close to your measured upload. Lower total bitrate by 10-15% and re-test.
- Network path. Switch from Wi-Fi to wired Ethernet where possible. If you must use Wi-Fi, move closer to the access point and avoid congested channels. Background uploads (cloud backups, file sync) on the same network will steal headroom.
Buffering (viewer sees a loading spinner)
Buffering is almost always a viewer-side or delivery-side issue, not a capture issue. Your stream is arriving; the viewer cannot pull it fast enough.
- Confirm it is viewer-side. Ask affected viewers what device and connection they are on. If buffering clusters on mobile networks or weak Wi-Fi, it is their download, not your upload.
- Enable adaptive bitrate so the platform can serve a lower rendition to viewers who cannot sustain the top one.
- Check your top rendition is not marginal. If your highest rendition is only just sustainable, viewers on the edge get pushed into buffering. A slightly lower top bitrate gives the platform’s ladder more room to work.
Pixelation and blockiness
Pixelation is compression struggling: not enough bitrate for the motion and detail in the frame.
- Is it constant or only during motion? Constant pixelation suggests bitrate is too low for the resolution. Motion-only pixelation suggests the bitrate is too low for the frame rate or the content’s complexity.
- Raise bitrate if headroom allows, otherwise lower resolution or drop from 60 to 30 FPS. Reducing frame rate frees bitrate for each frame and often clears motion pixelation without touching resolution.
- Check the codec. Confirm you are encoding H.264 for broad compatibility. A misconfigured or unusual codec can produce artefacts and playback failures on some devices.
Audio-video sync drift
Sync problems are usually cumulative drift, not a fixed offset, and they are often caused by mismatched clocks or buffer settings.
- Check the encoder’s audio delay/offset setting first, a small fixed offset (tens of milliseconds) can correct a constant lag.
- Confirm the correct audio input device is selected and that sample rate matches across camera, capture device and encoder (48 kHz throughout avoids resampling drift).
- Restart the encoder if drift accumulates over time; a fresh session resets buffers.
Unexpectedly low playback resolution
If viewers report a soft or low-resolution picture even though you are sending 1080p, the cause is usually playback, not capture.
- Check the platform’s rendition ladder. Confirm the platform is actually transcoding your 1080p ingest into a 1080p rendition; some configurations cap the top rendition.
- Check viewer settings. Many apps default to data-saving or auto quality; ask viewers to confirm their quality setting.
- Check viewer connection. Adaptive playback will step down on a weak connection regardless of what you send.
Monitor during the stream, not just before
A pre-event test proves the setup can work; it does not prove it is working now. During the broadcast, keep an eye on:
- Encoder dropped-frame counter, any sustained increase is a warning.
- Encoder CPU/GPU load, spikes indicate the machine is struggling.
- A second device watching the live stream, the only way to see what viewers see.
Do not make large settings changes mid-stream. Small, single-variable adjustments (for example, lowering bitrate by 10%) are safer than switching resolution or frame rate live, which can force a re-connect and interrupt viewers.
Most quality problems trace back to one root cause: settings that exceed what the connection and encoder can sustain. Measure first, match settings to the measured capacity, and monitor during the event.
Frequently Asked Questions
What internet speed do I need for an HD quality live stream?
For 1080p HD streaming at 60 FPS, upload speed of at least 8-12 Mbps is essential. For 720p at 30 FPS, 4-6 Mbps is typically sufficient. Measure your actual upload speed before the event using free tools like Speedtest. Account for network overhead and other users on your connection; aim for 1.5 times your calculated bitrate to ensure stability and prevent dropped frames during your live broadcast.
What bitrate should I use for 1080p live streaming?
For 1080p at 60 FPS, use a bitrate of 6000-8500 kbps (video) plus 128-192 kbps for audio. At 30 FPS, 4000-6000 kbps is adequate. Constant bitrate encoding is often preferred for live streams. Test your chosen bitrate during a pre-event rehearsal on your actual network to confirm stability and picture quality across different devices before your viewers join.
How do I stop my live stream from buffering or dropping frames?
First, verify your upload bandwidth meets the bitrate you’ve set; if not, lower resolution or frame rate. Check encoder CPU usage, if it exceeds 80%, reduce quality settings or upgrade your hardware. Enable adaptive bitrate streaming if your platform supports it, which can adjust quality to match viewer bandwidth. Close background applications consuming network or CPU resources, use a wired ethernet connection instead of Wi-Fi, and monitor network stability during a test stream before your event.
Should I stream in 720p or 1080p?
Choose 1080p if your upload speed exceeds 8 Mbps and your audience watches on larger screens or desktops; it delivers noticeably sharper detail. Use 720p if upload bandwidth is limited (4-6 Mbps), your audience primarily watches on mobile devices, or network stability is uncertain. Test both resolutions during a pre-stream rehearsal to see which delivers the best quality-to-stability ratio for your specific internet connection and viewer base.